Mastering Dynamic Summing in Excel with OFFSET and MATCH

If you need to sum a variable number of cells, such as calculating a year-to-date total for a monthly budget (e.g., from month 1 to month 5), here’s an efficient way to do it.

Step 1: Define Your Parameter

Start by defining the parameter. This could be the month number or the last day of the month, from which you can extract the month number using the formula MONTH().

Step 2: Use the SUM and OFFSET Functions

To achieve this, combine the SUM function with the OFFSET function. Here’s how OFFSET works:

  • Offset: You provide a reference range, and OFFSET shifts the starting point by a specified number of rows or columns.
  • Size Constraints: You can also define the number of rows and/or columns to include in the new range, which is key for our situation.

Example:

Here’s how it looks in action:

Let’s have a look at the formula :

There are certainly other ways to achieve this, but this method works well and is straightforward. Do note that you’ll need an up-to-date version of Excel to use the OFFSET function.

Going Deeper:

To make it more dynamic, you can also use the MATCH function to select a specific category, such as “Commerce” instead of “Marketing.” This adds flexibility, allowing you to fine-tune what data you want to sum.
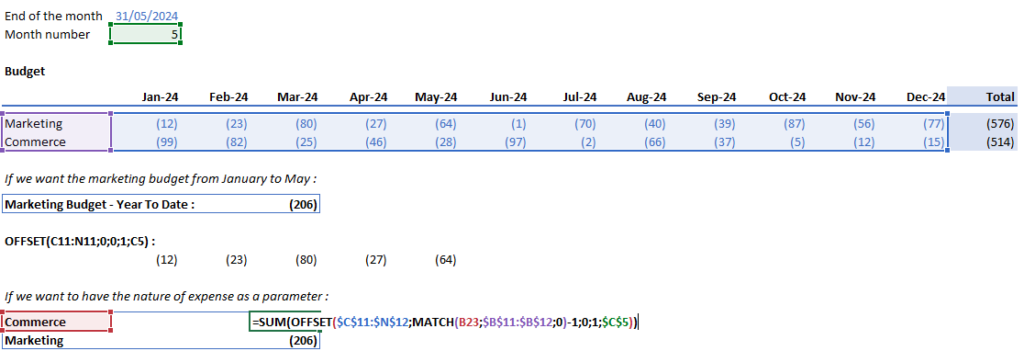
This proves to be useful when you want to compare year-to-date Actuals with year-to-date Budget at the end of a month.

Adjust a monthly budget in a second

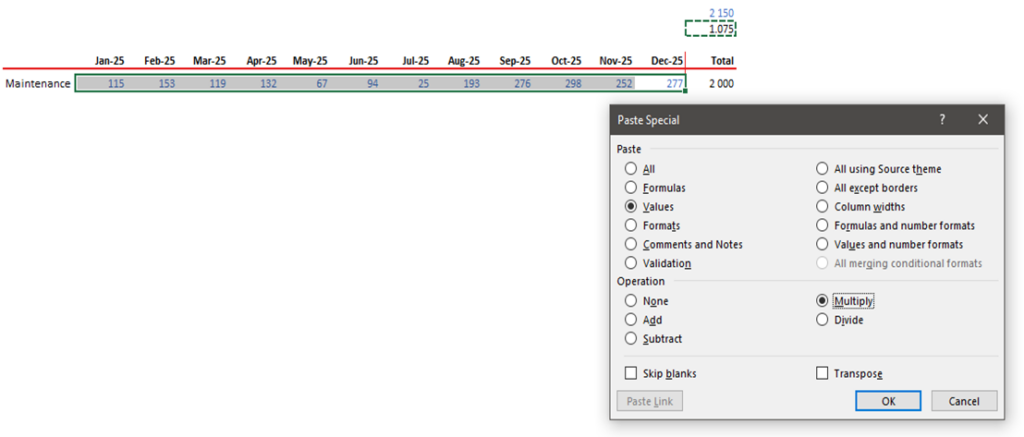
Sometimes you need to adjust a monthly budget for a certain item. For instance, let’s say you want to change the total budget from €2,000k to €2,150k.

Here’s a quick way to do it:

  1. Calculate the Adjustment Factor: Compute the ratio of the new total to the old total:

Adjustment Factor = 2,000 / 2,150 = 1.075

  1. Copy the Adjustment Factor: Copy the cell containing the value 1.075.
  2. Select the Monthly Budget Cells: Highlight the 12 cells that contain the monthly budget values.
  3. Apply the Adjustment Factor:
    • Right-click on the selected cells.
    • Choose Paste Special > Paste Special.
    • In the dialog box, select “Multiply” and “Values”.
    • Click OK.


By multiplying all the monthly budget cells by 1.075, your annual budget will be adjusted to €2,150k:

SUMIFS on both columns and rows

When you have criteria that apply to both rows and columns, summing elements based on these criteria can be a bit tricky. Here’s an example to illustrate this:

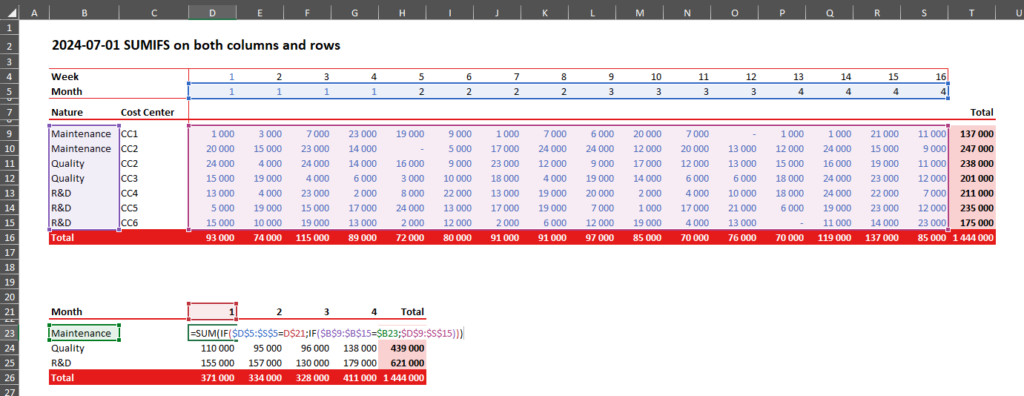
Imagine you want a summary of data month by month for each category (Nature). You need to check the criteria both on the Nature column and the Month row. Here’s how you can do it:

The Formula

=SUM(IF($D$5:$S$5=D$21;IF($B$9:$B$15=$B23;$D$9:$S$15)))

This formula will give you the desired summary:

Breaking It Down

To understand how this works, consider the formula without the SUM function:

=IF($D$5:$S$5=D$21;IF($B$9:$B$15=$B23;$D$9:$S$15))

This formula will return a new range based on your criteria:

  1. $D$5:$S$5=D$21: Checks if the values in the month row match the specified month.
  2. $B$9:$B$15=$B23: Checks if the values in the nature column match the specified nature.
  3. $D$9:$S$15: Refers to the data range you want to sum.

Will give you a new range:

When you sum this new range, you will get the total for the specified nature and month. For example, this will give you the sum of the maintenance for the 1st month, exactly as expected.

Example Summary

By applying this formula, you can create a summary table like the one below:

Use this technique to effectively sum data with multiple criteria across both rows and columns.

Mastering F5 in Excel

Pressing F5 in Excel allows you to navigate to specific cells and select certain cells based on criteria. Let’s break it down:

Navigate to a Cell

Simply press F5 and enter the cell reference to swiftly move to a specific cell.

Select Specific Cells

Click on “Special” to access a range of selection criteria. Here are some commonly used ones:

  • Constants: select only cells containing a value, for instance to color them all in blue
  • Formulas: select only cells containing a formula
  • Blanks: select only blank cells
  • Visible cells only: When filtering data, this option selects only the visible cells. Very useful if you want to paste a formula to filtered cells only

Mastering F5 empowers you to efficiently navigate and manipulate data in Excel.

The various ways of pasting in Excel

In Excel, pasting isn’t always as straightforward as pressing Ctrl + V. By right-clicking and selecting “Paste Special,” you can access a range of pasting options.

Let’s explore the most commonly used types of pasting:

  • Formulas: Pastes the formula only.
  • Values: Pastes the value without the formula.
  • Formats: Pastes the format only.
  • Multiply: Multiplies the content in the cell by what was copied.
  • Divide: Divides the content in the cell.
  • Transpose: Converts a row into a column or vice versa.
  • Paste Link: Inserts a link to the copied cell. Very useful when combined with the method of using another window of the same Excel file.

These are the fundamental pasting methods you’ll find yourself using frequently in Excel.

Some Basic Shortcuts in Excel: Select/Add/Remove Row or Column, Re-do Last Action

To select a row, press Shift + Space
For selecting a column, press Ctrl + Space. That’s when respecting the « never use merge » rule gets beneficial. If you’ve merged cells, using Ctrl + Space will select all merged columns—not what you want.

With a row selected, Ctrl + ‘+’ adds a new row, and Ctrl + ‘-‘ removes the selected one.

Similarly, for columns, Ctrl + ‘+’ adds a new column, and Ctrl + ‘-‘ removes the selected one.

Of course you also have Ctrl + C to copy, Ctrl + X to cut and Ctrl + V to paste, Ctrl + Z to cancel last action and Ctrl + Y to redo the last action canceled but these are not specific to Excel.

Press F4 to redo the exact same action you just performed. It can be adding color, inserting a row or anything you just did.

Use these shortcuts regularly, and they’ll soon become second nature.

Automating Your Excel Files

Automating your Excel files can save you time and streamline your workflow. Here’s how to do it:

  1. Structure Your File: Organize your file into three main sections: Outputs, Analysis, and Inputs. This helps maintain clarity and organization. Refer to this post.
  2. Respect Rule #1: Use blue for parameters to easily identify and differentiate them from other data. Refer to this post.
  3. Formula-Based Computation: Anything that can be computed should be computed with a formula so that you never have to think about it again (even text such as the month in letters).
  4. Avoid Editing Sources: Instead of directly editing original sources, add formulas on the left or the right, even to deal with exceptions. This preserves data integrity and simplifies updates.
  5. Utilize Mapping Tables: When necessary, use mapping tables to standardize data or perform lookup operations.
  6. Eliminate Copy-Pasting: Try to avoid copy-pasting data. Instead, use formulas or data extraction with the use of pivot tables.
  7. Avoid manually entering data into cells whenever possible: It should be extracted from an Excel source whenever possible.
  8. Automate Error Checking: Use formulas to automate error-checking processes, ensuring data accuracy and consistency.
  9. Organize Data: Maintain data in list format to facilitate sorting, filtering, and analysis using pivot tables.
  10. Consider Macros: Explore the use of macros for repetitive tasks or complex operations. For instance, it can be used to send a pdf file to multiple recipients.

By following these guidelines, you can automate any Excel file, making updates and adjustments a breeze, requiring only to update some parameters and the inputs.

Should you automate your Excel Files ?

Whether it’s for daily, weekly, or monthly tasks like revenue analysis, margin tracking, or cash flow forecasts, automation can be a game-changer.

Some may argue that manual work helps uncover errors or aids in analysis, but I see it differently. Automating your files offers numerous benefits:

  • Deep understanding: Automating forces you to grasp the intricacies of your processes, including handling exceptions.
  • Time savings: You’ll save a lot of time, for sure. Time that can be dedicated to being a business partner, doing non recurring analysis that will make your company move forward (which is not the case with recurring analysis).
  • Delegation Ease: Automated files are easier to delegate, freeing up even more of your time.
  • Continuous Improvement: With automation in place, you can continuously refine and enhance your files. This will allow to push further the analysis.
  • Fastest Way to the End Result: You’ll get faster to the end result and you will spot with more ease potential mistakes. Then, and only then, you need to go into the details.

So, the next time you open a familiar Excel file, consider automating it step by step.
Tomorrow we’ll see exactly how to do it.

Excel Formula Tracking Tips

Dependents:

  • To check if data is used in a formula elsewhere, go to Formulas > Trace Dependents (Alt > M > D).
  • This can be particularly useful when you want to make sure you have correctly used an hypothesis in a business plan or a budget for instance.

Precedents:

  • If you’re in a cell with a formula and want to identify its dependencies, try Formulas > Trace Precedents (Alt > M > P). It helps locate sources, especially across different sheets (double-click on the dashed arrow)

    Removing Arrows:

    • When you’re done, remove arrows using Formulas > Remove Arrows. (Alt > M > A > Enter)

    Custom Excel Settings

    If you’re into tweaking Excel to your liking, here’s my personal setup:

    Go to File > Options (Alt > F > T) :

    • General > Font size: 9
    • Advanced > After pressing Enter, move selection: Unchecked
    • Advanced > Decimal separator: Dot
    • Advanced > Thousands separator: Space
    • Formulas > Error checking rules: All unchecked
    • Don’t forget to add the Developer tab if you want to record macros: Customize Ribbons: Check “Developer”

    It’s not a must-do, but whenever I fire up Excel, I quickly set it up this way.

    Feel free to play around with colors too (General > Office Theme)